Inline Widgets
With the release of The Widgets Update, Stack provides some interesting ways to display various data on your desktop.
While other documentation is still being updated in the preparation for rollout, I am going to show how to make a widget, that displays your favorite news feed. In this case, I will embed the blog of Scott Hanselman, famous for his hands-on articles for Windows developers and power users.
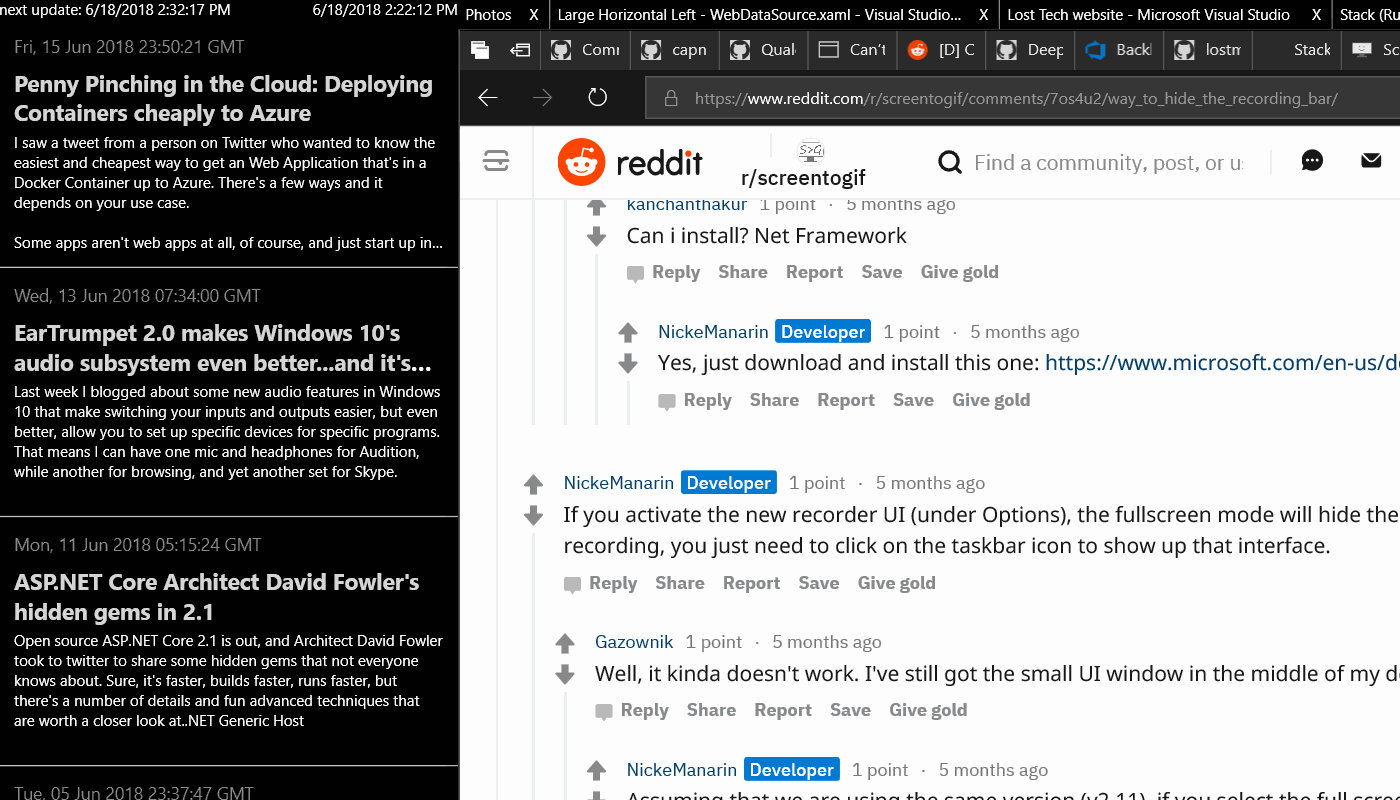
The sample is based on the Large Horizontal Left layout. Result will look like this:
Contents
Get the data
Since we want custom UI for the blog, first we need to retrieve its entries in some machine-readable format. Fortunately, most blogs support at least one of web syndication formats: Atom and/or RSS.
Scott’s blog is not an exeption. If you open it, and look at the page source, you will find the following entries, pointing to the feeds:
<link rel="alternate" type="application/rss+xml" title="Scott Hanselman"
      href="https://www.hanselman.com/blog/SyndicationService.asmx/GetRss">
<link rel="alternate" type="application/atom+xml" title="Scott Hanselman"
      href="https://www.hanselman.com/blog/SyndicationService.asmx/GetAtom">
For this example we will use RSS feed. Let’s go ahead and add it to the layout.
First, a reference to the new widget data sources is required, which needs to be added to the top of the file next to the similar entries:
xmlns:...
xmlns:sources="clr-namespace:LostTech.Stack.Widgets.DataSources;assembly=LostTech.Stack.Widgets"
xmlns:...
Now we can add a data source, that retrieves data from the Atom link above.
This will go into the topmost ResourceDictionary:
<sources:WebDataSource x:Key="RssFeed"
    Url="https://www.hanselman.com/blog/SyndicationService.asmx/GetRss"/>
NOTE: You can replace this URL with the URL for your favorite RSS feed, and most of the code will still work.
Parse the data
The data from the link above comes as a long machine-formatted string (check a readable example here). Before displaying it, we need to parse it into individual pieces.
The format is called XML, and Stack includes a parser for it already.
There’s also a JSON parser available, and an HTML parser planned.
To add XML parser to your layout, first reference Stack’s data binding:
xmlns:binding="clr-namespace:LostTech.Stack.Widgets.DataBinding;assembly=LostTech.Stack.Widgets"
Then add the parser to the same ResourceDictionary where you put WebDataSource:
<binding:XmlParser x:Key="XmlParser"/>
(in the future this step might not be needed).
Now you can use the parser to display some simple information from the feed.
For example, you can add this anywhere to your layout to show blog latest update time:
<TextBlock Text="{Binding Content,
                    Source={StaticResource RssFeed},
                    Converter={StaticResource XmlParser},
                    ConverterParameter=rss.channel.lastBuildDate,
                    IsAsync=True}"/>
A couple of things to note here:
ConverterParameterspecifies which part of the document to useIsAsync=Trueenables Stack to not block your mouse and keyboard while data is parsedBinding Contenttells the binding to use text inside<lastBuildDate>2018</lastBuildDate>
Go ahead and try it, before we go ahead with more complex part, which is creating an actual custom UI to display blog entries.
List the articles
It will be very easy to simply list article titles. Standard XAML already provides
a way to build a simple list: ListView control:
<ListView
    ItemsSource="{Binding Content,
                    Source={StaticResource RssFeed},
                    Converter={StaticResource XmlParser},
                    ConverterParameter=rss.channel.item, IsAsync=True}"
    DisplayMemberPath="title"
/>
Now if you’ve done everything correctly, when your reload the layout, you’ll see:

Make it look nice
I am not a design expert, so instead of trying to make one myself, I will adapt an existing good looking RSS reader from Microsoft XAML samples and tweak it a bit.
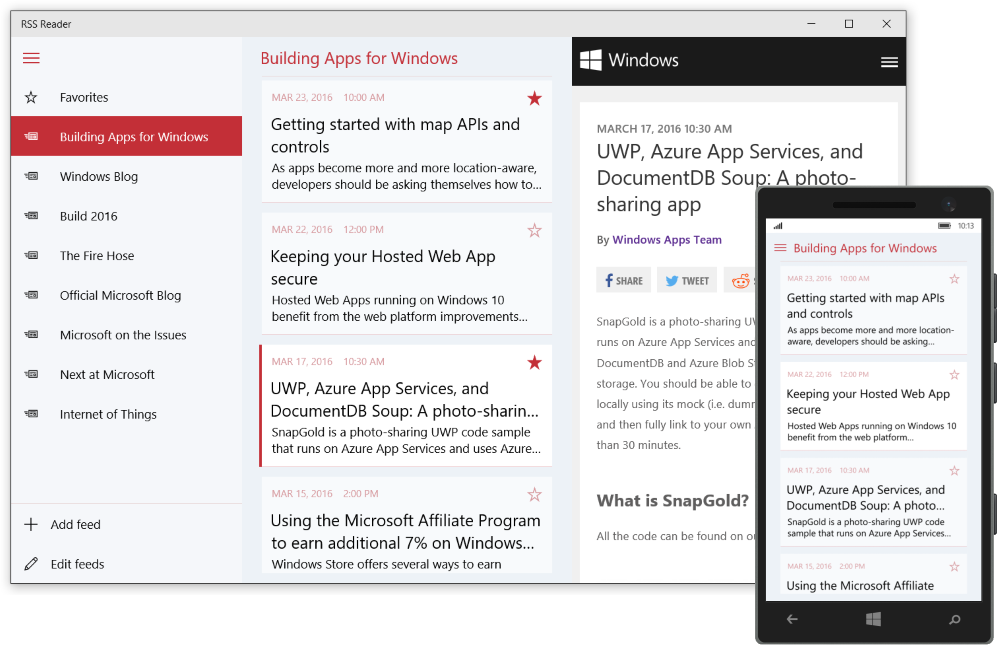
The original layout for a single entry is here: link. However, it is written in a Windows 10+ only version of XAML, so I had to adapt it to work with Stack, and change bindings to show relevant feed elements.
I also had to add Stack’s HtmlToTextConverter to display short excerpts as plain text.
Here’s what I’ve got (careful, very long):
<binding:HtmlToTextConverter x:Key="HtmlToText"/>
<DataTemplate x:Key="ArticleItemViewTemplate">
  <Grid>
      <Grid>
          <StackPanel>
              <Grid Margin="12,12,12,0">
                  <Grid.RowDefinitions>
                      <RowDefinition Height="Auto" />
                      <RowDefinition Height="*" />
                      <RowDefinition Height="*" />
                  </Grid.RowDefinitions>
                  <TextBlock Grid.Row="0"
                            Text="{Binding pubDate}"
                            TextWrapping="NoWrap"
                            Foreground="Gray"
                            FontSize="14"
                            />

                  <TextBlock Grid.Row="1"
                            Margin="0,8,0,0"
                            TextWrapping="Wrap"
                            MaxHeight="52"
                            TextTrimming="CharacterEllipsis"
                            Foreground="White"
                            FontWeight="Bold" FontSize="18"
                  >
                    <TextBlock.Resources>
                      <Style TargetType="{x:Type Hyperlink}">
                        <Setter Property="Foreground" Value="LightGray" />
                        <Setter Property="ForceCursor" Value="True" />
                        <Setter Property="Cursor" Value="Hand" />
                        <Setter Property="TextDecorations" Value="None" />
                        <Style.Triggers>
                            <Trigger Property="IsMouseOver" Value="True">
                                <Setter Property="Foreground" Value="Khaki" />
                            </Trigger>
                        </Style.Triggers>
                    </Style>
                    </TextBlock.Resources>
                    <Hyperlink
                        CommandParameter="{Binding link}"
                        Command="{x:Static widgets:Commands.LaunchUrl}">
                      <Run Text="{Binding title}" />
                    </Hyperlink>
                  </TextBlock>

                  <TextBlock Grid.Row="2"
                            Margin="0,4,0,12"
                            Text="{Binding 'description.#cdata-section', Converter={StaticResource HtmlToText}}"
                            TextWrapping="Wrap"
                            MaxHeight="100"
                            TextTrimming="CharacterEllipsis"
                            Foreground="White"
                            />
              </Grid>
              <Rectangle x:Name="BorderBottom"
                        Grid.Row="2"
                        Height="1"
                        HorizontalAlignment="Stretch"
                        VerticalAlignment="Bottom"
                        Fill="Silver" />
          </StackPanel>
      </Grid>
  </Grid>
</DataTemplate>
Insert it into the ResourceDictionary just below our XmlParser.
This also requires a new reference:
xmlns:widgets="clr-namespace:LostTech.Stack.Widgets;assembly=LostTech.Stack.Widgets"
that is used to open articles by clicking on them:
...
<Hyperlink
    CommandParameter="{Binding link}"
    Command="{x:Static widgets:Commands.LaunchUrl}">
...
Now we can replace the default ListView with our customizedlooks.
Replace the above ListView with:
<ItemsControl
    ItemsSource="{Binding Content,
        Source={StaticResource RssFeed},
        Converter={StaticResource XmlParser},
        ConverterParameter=rss.channel.item, IsAsync=True}"
    ItemTemplate="{StaticResource ArticleItemViewTemplate}"
/>
And, voila!
Conclusion
You can find general documentation on the GitHub page for the project. Or download the full layout, that includes all the elements described here, and some more.
If you have any questions, please ask on our Q&A community.
Stay tuned for more!